
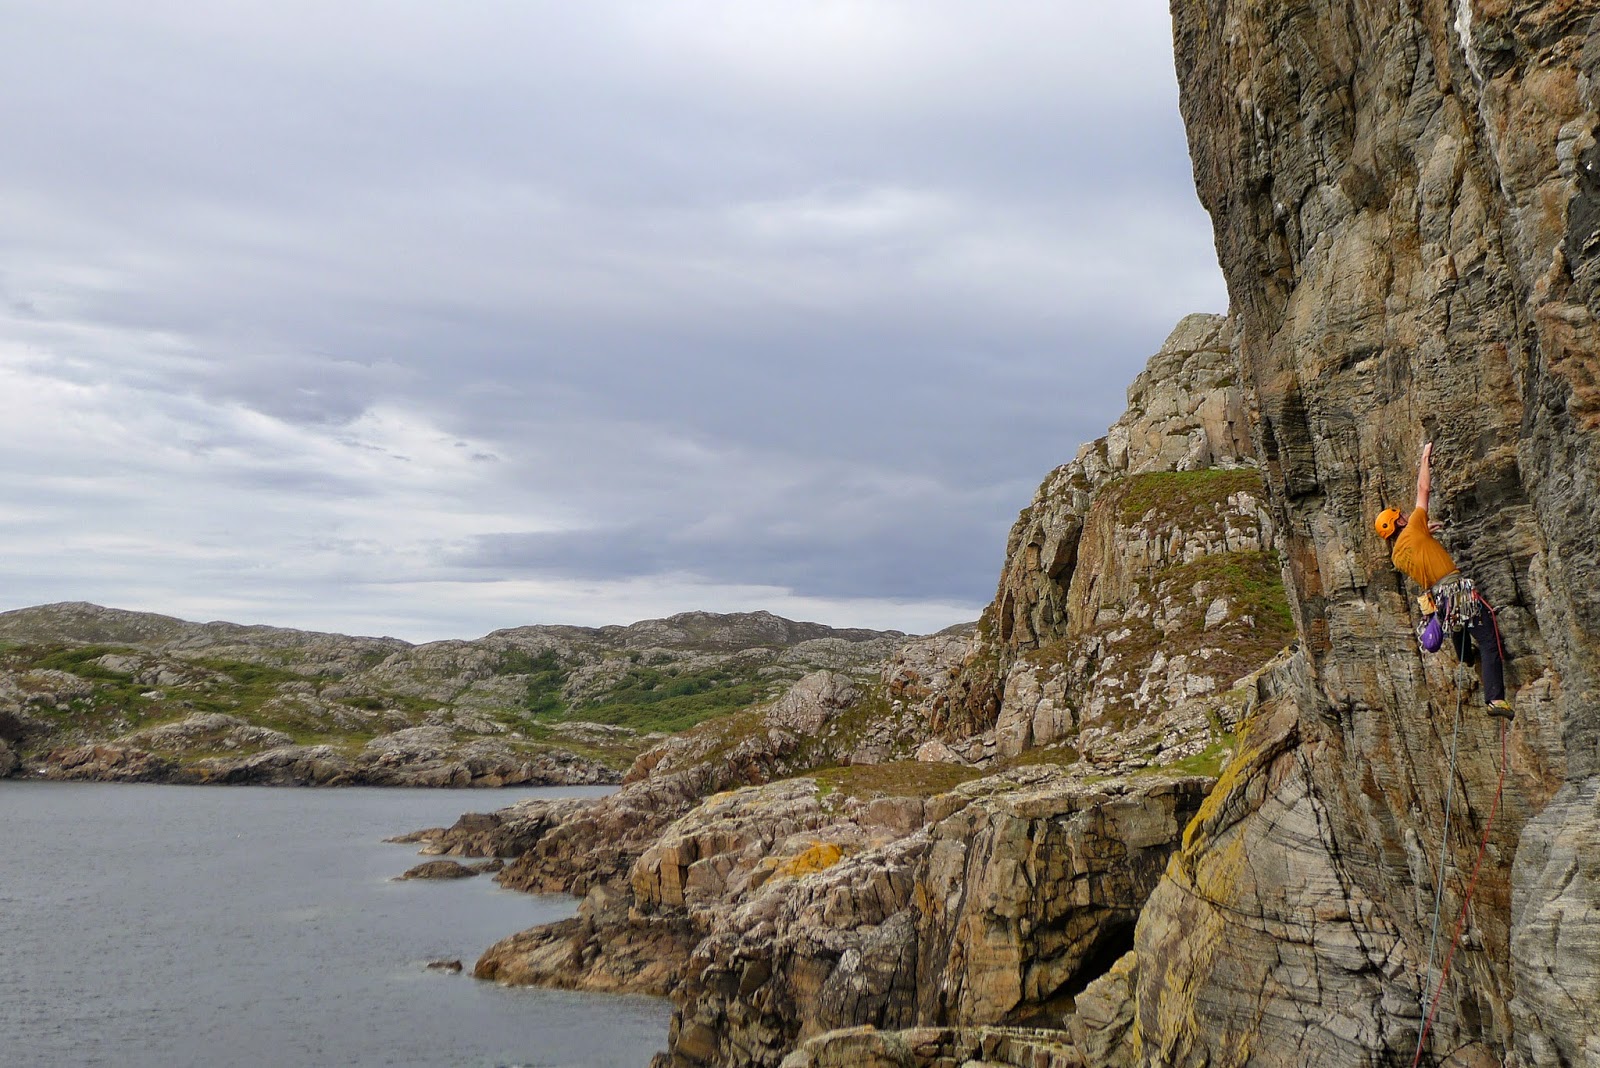
Creag Rodha Mor aka Super Crag is a sort of 'Gogarth meets Sheigra'. The crag consists of a very steep west facing 40m wall and a couple of south facing stepped walls (The Burnished Walls). Despite some big guano ledges no sea birds appear to nest on the Main Wall (probably too scared), but on The Burnished Walls there are a few shags right of Rolling Foam and the odd fulmar on a grassy ledge.
Approach: 40 minutes, but may take a bit longer the first time! Grid Ref NC056 236
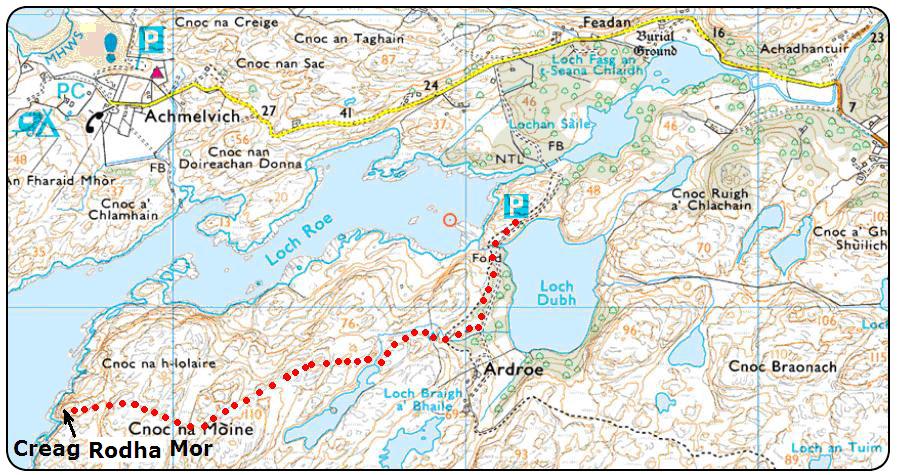
Although it doesn’t look far on the map the approach feels fairly complex and the ground is quite rough. Take the single track Achmelvich road from the B869 Lochinver to Stoer road and after about 1km turn left down a narrow road (signposted footpath to Baddidaroch). Park at the top of the hill where the tarmac ends. This is the same parking as for Loch Dubh Crag. Continue along the new track; go through a gate and after 250m look out for a small stream coming in from the right. A very vague path follows the stream past some pig pens and ruined crofts, then onto the open ground above. All this section can be hard to follow once the bracken has grown. Cross a fence and continue following the stream to a narrow lochan. From here head west over ridges and drainage channels until the ground starts dropping down to the sea. If you’re lucky then off to the left you’ll spot a large, heather covered mound at the end of a ridge running out to sea. This is the top of the crag. Dropping down to the left (facing out) allows a good view of The Burnished Walls with the Main Crag beyond. There’s also a handy small steam near the viewing point.
Conditions: The crag dries quickly, but give it a day or two after a heavy rain. It is susceptible to the normal sea-cliff problems of condensation and is probably best avoided on still, humid days. Generally bright, breezy weather gives the best conditions. It can get totally roasting in the sun.
The Burnished Walls South Facing
The Burnished Walls are about 40m at the right end and 20m on the left. Above the shorter section is a luxurious grassy ledge known as Ant Ledge. This is easily accessed from the landward end via a sloping ramp and short down climb. A 35m abseil from a big block on Ant Ledge gains non-tidal ledges below the walls. The walls are a real suntrap.

Upper Wall
1 Falconer Cracks 15m VS 4b* Tess Fryer, Ian Taylor 1/5/11
Climb the obvious crack above the big block on Ant Ledge.
2 Bogie Wonderland 6m E2 6a* Ian Taylor, Tess Fryer 1/6/11
Above the step in the descent ramp to Ant Ledge is a perched block. Climb the most continuous crack right of the block.
Lower Wall
The most prominent features of the Lower Wall are the short arête on the left (Rusty Buckets), the central crack below the step and the steep hanging corner to its right.
From left to right.
3 Crystal Shell 20m E3 5c** Ian Taylor, Tess Fryer 24/4/11
Just left of the arête is a flake crack and Crystal Shell climbs the vertical crack to its left. Start by stepping left to the whacky crystalline hollow then follow the surprisingly steep crack to a ledge. Finish up the red corner and short walls above.
4 Champagne Rhubarb 20m E2 6a** Ian Taylor, Tess Fryer 22/4/11
Climb the flake crack just left of the arête until below the roof. Swing rightwards onto the arête and go up a crack at the right end of the roof to a ledge. Belay here or on Ant Ledge just above. Finishing leftwards as for Crystal Shell makes a nice E1 5b**.
5 Rusty Buckets 20m E3 6a*** Tess Fryer, Ian Taylor 22/4/11
The thin crack line, just right of the arête, gives a pumpy little gem. Finish up a brown slab above the break. High in the grade and not a good warm up!

6 The Shiner 20m E5 6a** Tess Fryer, Ian Taylor 30/4/12
Start up the left side of the hanging block. Go up, take a diagonal crack leftwards for a couple of metres, then make hard moves up the wall above. Another pumper.
7 Read My Lips 20m E4 6a** Tess Fryer, Ian Taylor 24/4/11
Start up the right side of the hanging block to follow a rightwards trending crack to below a nose. Make a mean move to go round the left side of the nose and finish more easily.
8 Small Time Girl 20m E2 5b/c* Tess Fryer, Ian Taylor 29/4/11
This takes the vague crack line right of Read My Lips until below the very steep headwall. Follow a break rightwards until able to gain the ledge above and finish up the short wall.
9 The Melting 20m E2 5c** Ian Taylor, Tess Fryer 19/5/13
Start left of the easy ramp and go more or less directly up the wall to finish up Small Time Girl. The best route on this section of wall.
10 Vive La Republique 20m E1 5a* Ian Taylor, Tess Fryer 29/4/11
Start at an easy ramp and go up a crack to a break, move right along the break to a flake and go up this to Ant Ledge.
11 Burnt Umber 20m E1 5a Ian Taylor, Tess Fryer 7/5/11
From the easy ramp go up rightwards to the top of a nose, just left of the central crack. Continue using the crack and the wall to its left.
Watch out for a bit of loose rock at the top of the following three routes.
12 Mega Flake 40m E2 5c** Tess Fryer, Ian Taylor 22/4/11
Start at the central crack and climb this for 10m then follow a diagonal line rightwards heading for a big bleached flake in the middle of the right side of the wall. Monkey up the flake and at its top go right and follow a line to the top.
13 Shades of Glory 30m E2/3 5c* Tess Fryer, Ian Taylor 24/4/11
Start as for Mega Flake but move right and go up a shallow groove and golden crack above to reach easier ground (junction with Mega Flake). Go slightly left and climb a steep flake a couple of metres left of the big bleached flake. Belay on the ramp above.
The following route sometimes has shags nesting at the start so is best avoided then.
14 Rolling Foam 45m E3 5c*** Ian Taylor, Tess Fryer 24/4/11
A well positioned route up the hanging corner round to the right. Traverse right into the corner and follow it steeply until able to pull onto a welcome ledge on the left. Go straight up the wall above then trend right to gain some grey flakes and follow these over a final bulge to the ramp.

The following two routes are on the wall right of Rolling Foam and are easily accessed from the grass terrace at the right end of the crag.
15 Foamo 20m E3 5c* Tess Fryer, Ian Taylor 2/6/13
Go up left-trending ramps easily to gain a right trending crack. Follow this to a grey niche with a steep right wall. Go up rusty rock left of the niche to the top. Worthwhile, but some snappy rock.
16 Midget 20m E2 5c
Tess Fryer, Ian Taylor 2/6/13
Lies right of Foamo. The vertical crack above the grass terrace is climbed direct.
Main Wall West Facing
The impressive Main Wall rears up from a sloping, non-tidal ledge system, which can be gained by a short 10m abseil from Ant ledge. Although it’s hard to get a good view, the right hand side can be seen from Ant Ledge. The major features are a brown corner at the right end, two large guano covered ledges right of centre (one at 20m and one at 30m) and a big groove line left of centre, with a smooth wall to its left. The rock varies from solid juggy grey gneiss to a disconcertingly smooth brown variety. As with any big sea cliff there are occasional loose sections and in general it feels a bit snappier than Sheigra. It comes into the sun about 3pm. Apart from at high tide it is possible to scramble down to sea level and escape off leftwards. There is a 6m E2 5c up an open corner in the centre of the small steep wall below Guanissimo.

From right to left
17 Ruddy Glow Corner 30m E4 6b** Ian Taylor, Tess Fryer 22/4/11
This is the big obvious brown corner at the right end of the Main Wall. Start below and right of the corner and go up easily until a diagonal line, over large grey blocks, gains the corner proper. Make some committing moves up the corner then get burly.

18 The All Abilities Path 40m E4** Tess Fryer, Ian Taylor 19/6/11
Climbs the steep wall right of Guanissimo, followed by an ‘escape’ up the top section of Personal Mingually.
20m 6a Start just right of the yellow ramp and go boldly up the wall to good holds and gear. Make hard moves to gain a flake line and follow this into the left hand groove above. Exit from the groove to belay on a sloping ledge below a dauntingly steep brown wall.
20m 5c Hand traverse left below the steep wall until below an open brown groove just right of the higher guano ledge. Go up the groove, pulling left onto a sloping ledge at a black band. Continue via a hanging flake, pulling onto a slab to finish.
19 Guanissimo 60m E2*** Tess Fryer, Ian Taylor 1/5/11
A fine natural line that wanders around to give the easiest route on the Main Wall. A hanging ramp leads up and left to the lower guano ledge and a right facing flake system leads to the right end of the hanging ramp.
20m 5b From an easy yellow ramp gain and climb the flake passing the right hand of two black ‘eyes’. At its top follow the ramp easily leftwards to belay on the lower guano ledge.
40m 5b Go up the steep flake crack above, to reach a juggy handrail and follow this leftwards to belay on the higher guano ledge. It is possible to belay here, but it’s awkward to arrange. Traverse left 4m then make an awkward move onto a sloping ledge. Continue easily to an herbaceous finish.

20 (My Own) Personal Mingulay 45m E4**** Ian Taylor, Tess Fryer 7/5/11
An excellent direct route with two great pitches.
20m 5c Start just left of Guanissimo and go up a line of steep flakes, passing the left hand of the black ‘eyes’, to gain the middle of the sloping ramp. A rattling block in the flake line seems to be well keyed-in. Move left and belay as for Guanissimo.
25m 5c Go up the flake crack above to gain the juggy handrail as for Guanissimo. Move left, then go up an open brown groove, pulling left onto a sloping ledge at a black band. Continue via a hanging flake, pulling onto a slab to finish.

21 The Assyntialist 35m E6 6b/c** Niall McNair, Iain Small (both led) 25/8/12
Easy pumpy climbing, a powerful crux and a fantastically positioned headwall comprises this route which would be 3* anywhere else but on this crag is merely a 2* route. Start as for Personal Mingulay and where this route goes off leftward along the ramp; forge straight up the grey striated wall boldly to a juggy break (common to All Abilities Path). Useful medium wire on right side of overlap, 2m above juggy break. Make hard moves under the overlap to reach for a small hanging corner on left side of overlap and follow the undercut flake leftwards to a good flake-jug. Continue up the headwall on flakes until a thin break below the top is reached, .3 and/or .4 camalot on left. Step right and either tackle the orange block directly (powerful) or step right again into a vague corner (awkward) and so to the top.
22 The Pabbay Express 20m E4 6a*** Tess Fryer, Ian Taylor 20/5/12
An alternative first pitch to Personal Mingulay. Slightly harder and slightly better. Start just left of Personal Mingulay and go straight up past two horizontal breaks to gain a shallow groove line that leads to a belay at the left end of the lower guano ledge. Continue up the second pitch of Personal Mingulay. If you do the whole thing in one monster pitch, then award yourself soft E5.

23 The Under Toad 40m E6 6b*** Ian Taylor, Tess Fryer 17/6/11
Start left of Personal Mingulay at a step in the sloping ledge. Climb up via flakes to gain a ledge below a thin, slightly rightwards trending crack. Follow the crack all the way to the left side of the lower guano ledge. Move left along a flake to a small rock scar and make hard moves up a thin crack to the upper guano ledge. Move right off the ledge to the open brown groove of Personal Mingulay and finish up this. Bottom of the grade.

24 The Heart of Beyond 40m E7 6b*** Iain Small, Niall McNair (Both Led) 23/6/12
Excellent pumpy climbing followed by an exhilarating crux. Possibly low in the grade. Start 2m left of Undertoad and climb via big flakes, breaks and blocks for 10m. Go up wall right of corner on pockets and flakes to a good break and good cams. Hand traverse this for 3m then go up on obvious left facing flakes to a second break system (purple camalot on left). Along break (small cam) then up on flakes again to jugs. Move up to flat holds then boldly trend left past a rock scar to a hidden sidepull (crux) and make a long reach for a hand rail on edge of guano ledge. Tackle overhanging wall at right end of ledge to gain a good foot ledge then trend up and right to the top of the crag.
25 The Ambassadors 40m E6 6b**** Ian Taylor, Tess Fryer 20/5/12
The central line on the Main Wall starting up an obvious groove with two downward pointing grey flakes at 15m. Intricate and committing on the crux section. Gain the groove by following a thin flake rightwards to a ledge, then moving left to another ledge. Go up the groove past the downward pointing flakes and make a long move from undercuts to gain a horizontal break in the brown rock. Hard moves up and left lead to a precarious ramp, at the top of which small wires can be fiddled in. Move right, then make more hard moves up to a line of improving holds and follow these rightwards until able to pull awkwardly onto the high guano ledge. Move left 4m, pull onto a sloping ledge and finish easily. Belay well back. Instead of ‘following the improving holds rightwards‘ it is possible to gain the guano ledge more directly. This is The Embassy Finish and is slightly harder than the original line.

26 A Man In Assynt 40m E7 6b ** Iain Small , Blair Fyffe 8/12
A direct line heading straight for the ramp of The Ambassadors and boldly tackling the technical head-wall. Some hollow flakes on the lower section loose it a star. Start up the 3m flake of Rodha Mor to a roof. Pull out and follow a series of flakes until a tricky move out left gains a break and small ledge at the base of the ramp. Awkward moves lead to a break (gear) then a junction with The Ambassadors at the top of the ramp. Arrange a nest of smaller wires then make a long reach up to gain sidepulls. From a strenuous position a vital BD micro stopper no. 5 can be placed high in the small left facing corner above. Either reverse for a rest or continue hard left by a series of sidepulls (crux), to gain the hanging flake and some micro cams. Sustained moves lead to a break and holds above allow a foot traverse right along the thin ledge to reach a bigger ledge. Finish up the short wall above.
27 Roar More 40m E5 6a*** Tess Fryer, Ian Taylor 7/5/11
A big route with exciting climbing up the large left hand groove line. Start below and to the right of the groove at a 3m flake. From the flake steep moves up and left lead to a small guano ledge at the base of the groove. Follow the groove for 20m, then continue up a thin crack heading for a downward pointing flake. From the flake move up and left to another flake, then go straight up to a horizontal seam. Go left then finish up a slightly creaky flake.
28 Ramp it Up 45m E3 5c** Ian Taylor, Tess Fryer 1/5/11
This route goes up the groove of Rodha Mor, before escaping off to the left. Climb the groove for 20m to a large lump of black amphibolite, then hand traverse left to gain a yellow ramp and follow this leftwards to gain ledges. Continue left, then pull onto a lichenous slab to finish. Scramble off leftwards.
29 Ramp it Up Direct Start E4 5c** Tess Fryer, Ian Taylor 3/8/12
Start left of Rodha Mor at a thin crack. Climb the crack which trends rightwards into the big groove and a junction with the original route.
30 TIFS 35m E6 6b** Ian Taylor, Tess Fryer 2/6/13.
This is the vague hanging groove line on the wall left of Rodha Mor. Start under a short rightwards curving flake. Gain and follow the flake, then continue direct, with a hard section through brown rock, to a thin break. Continue more easily to another break, move right, then up to the ramp of Ramp It Up and a possible belay. Finish up and left as for Ramp It Up.
31 The Cullinan 35m E6 6b*** Ian Taylor, Tess Fryer 1/6/12
Yet another great route up the centre of the smooth wall left of Rodha Mor. Start at bowl shaped depression. Climb more or less straight up on positive holds, till a move left at 10m gains a large flake. From a big jug at the top of the flake make a move up, then round to the left to gain a positive hold (good gear down and to the left), then make further hard moves to an easing on a yellow slab. Go up a final crimpy wall to a ledge (possible belay) then finish up and left as for Ramp it Up.

32 Moonman 35m E5 6a/b** Niall McNair, Iain Small 26/8/12
Fine sustained climbing up the wall between the Cullinan and Browbeaten. Start 5m to the left of the Cullinan where a thin break slants up and to the left on small holds and flakes until some good breaks are gained. From the top juggy break make tricky moves up some small left facing flakes for a few metres until a step right can be made into a black intrusion and cams (common with the Cullinan). Move left and continue upwards to a big flat hold, RPs and 0 or 00 BD tricam useful. A further couple of moves leads into the break of Browbeaten, finish up this.
33 Brow Beaten 55m E4 ** Ian Taylor, Tess Fryer 30/4/12
Takes a line just right of the left edge of the wall. Below and left of the main cliff is an undercut cave, gained by scrambling down leftwards from the sloping ledge (not at high tide).
20m 5b A fun little pitch. Start on the right side of the cave at a protruding nose. Move up from the nose to an undercut ledge and shuffle left along this. Surmount the bulge above to gain an open groove, then move left into a hanging corner. Up this to a small ledge below the main cliff.
35m 6a Climb up to gain a ledge, hand traverse a couple of metres rightwards, then make a committing move up to a diagonal break. Continue up to a flake of lighter coloured rock then hand traverse right and pullover onto an overhung ledge. Go steeply up and left for a few moves then follow a line diagonally rightwards on slabby rock to easier ground.
Enjoy our Blog? Follow us on Twitter Facebook or better still pop in the shop and say hello!